If you live in an older home, you’ve probably noticed a hairline crack creeping across a wall or ceiling at some point. Plaster has been around for centuries because it’s tough, fire-resistant, and gives a smoother finish than drywall ever could. But it’s not invincible. Over the years, it cracks, sags, and in pools, it wears down from constant exposure to water and chemicals. The good news is that most plaster damage is fixable, and a lot of it you can handle yourself with the right approach.
This guide covers why plaster cracks in the first place, how to patch it on walls and ceilings, what’s different about pool plaster, and roughly what it’ll cost depending on how bad the damage is.
Why Plaster Cracks in the First Place
There’s rarely one single cause. Moisture is usually the biggest culprit — a roof leak, a humid bathroom, poor ventilation in general — all of that weakens plaster over time until it starts to crack or crumble. Houses also settle as they age, and that shifting puts stress on plaster, especially around door frames and windows, where you’ll often see the first cracks show up. Then there’s just plain age: plaster from decades ago can lose its grip on the lath behind it, which leads to bulging or sagging patches rather than a clean crack. Pools are a different story altogether — there, it’s usually pH imbalance, mineral buildup, or years of swimmers and sun wearing the surface down.
Here’s the thing, though: patching a crack without dealing with whatever caused it (a slow leak, say) usually means you’ll be back to patching the same spot again next year.
How to Repair Cracks in Plaster Walls
For small to medium cracks, this isn’t a hard job. Most people can knock it out in an afternoon.
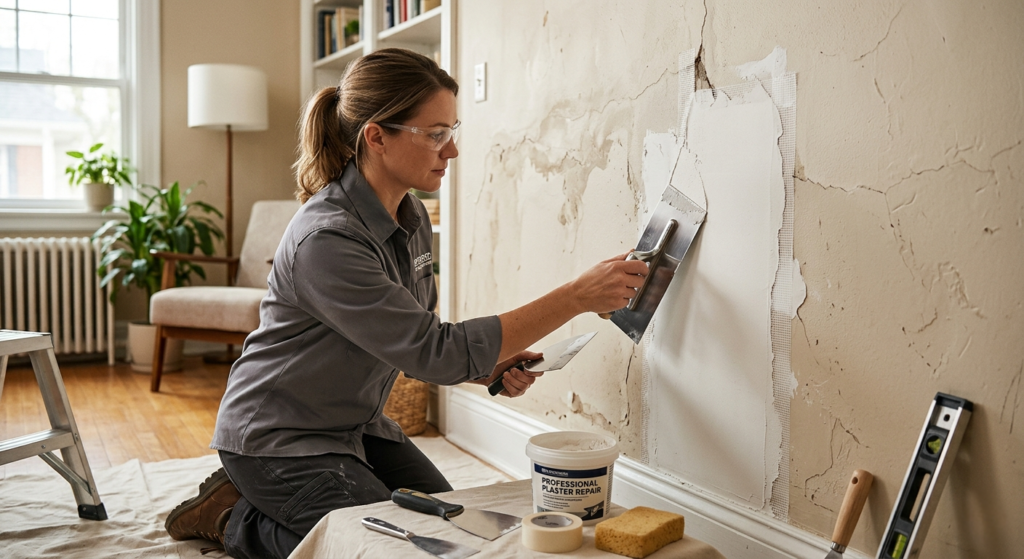
Use a utility knife or a church key tool to widen the crack slightly into a shallow V-shape — this gives the patching compound something to grip instead of just sitting on the surface. Clear out the dust and loose bits, then dampen the area with a little water. Skip this step, and dry plaster will suck the moisture out of your compound too fast, weakening the bond. Press the plaster repair compound (or joint compound, which works fine for smaller jobs) into the crack with a putty knife, feathering the edges so it blends in rather than sitting as a raised patch. Once it’s fully dry, sand it down and prime before painting.
If a crack keeps coming back, no matter how many times you patch it, the compound alone probably isn’t enough. Adding mesh tape underneath gives it a bit of flexibility, helping it withstand normal household movement instead of splitting open again.
How Do You Repair Plaster Walls With More Serious Damage?
A hairline crack is one thing. Actual holes, bulging sections, or spots where plaster has pulled away from the lath need more work. If it’s still attached but loose, plaster washers can screw it back into place before you patch over them. For real holes, cut back to a clean edge first, then build the patch up in layers — a base coat, then a finish coat — rather than trying to fill it all in one go. Rushing this part is the most common mistake people make, and it almost always shows up as a fresh crack a few weeks later.
Plaster Ceiling Repair Has Its Own Rules
Ceilings are trickier, mostly because gravity isn’t on your side. Sagging plaster on a ceiling usually means the “keys” — the bits of plaster that lock into the lath above — have broken off. In bad cases, that section can actually come down, so it’s not something to ignore. Small cracks and water stains can be handled the same way as walls, but if a ceiling feels soft to the touch or you notice any bulging, get it looked at before you start poking at it with tools. It’s also just physically harder to work overhead, so, beyond minor cosmetic cracks, many homeowners end up calling a plasterer for this rather than DIY it.
Picking a Plaster Repair Compound
Not every patching product behaves the same way. Plaster of Paris sets fast and matches old lime plaster well, but it doesn’t forgive a slow worker — you’ve got maybe a few minutes before it firms up. Joint compound is far easier to handle and sands down beautifully, which is why it’s the go-to for small wall cracks, though it’s not as tough for structural repairs. There are also flexible, crack-bridging compounds specifically made for plaster, which tend to hold up better in homes that shift with the seasons. Which one to grab really depends on the size of the job and how closely you need the patch to match.
Swimming Pool Plaster Repair
Pool plaster repair plays by entirely different rules, since you’re dealing with constant water and chemical exposure rather than just settling and humidity. Etching appears as a rough, pitted surface due to low pH. Scaling is the chalky calcium buildup you’ve probably felt underfoot. Spalling is the worst of the three — chunks of plaster actually breaking off the surface.
Minor surface issues can sometimes be patched while draining only the affected section, but most swimming pool plaster repair jobs end up requiring a full drain, especially when cracks go below the waterline or delamination is present. Pool plaster needs to cure and bond properly with the surface underneath, and getting that wrong underwater leads to repeat failures fast. This is honestly one of the few plaster jobs where calling a pro upfront usually saves money in the long run.
What Does Plaster Repair Cost?
It depends heavily on the scope. A small DIY crack repair might only cost you the price of a tub of compound and a putty knife. Hiring someone for the same minor job will cost more, but it’s still on the cheaper end. Larger wall or ceiling sections with actual structural damage cost more simply because of the labor and the drying time needed between coats. Pool plaster repair sits at the top of the range — draining, prep, and the specialized application work all add up. Your best bet is always getting a quote from a local plasterer, since labor rates shift a lot depending on where you are and how extensive the damage turns out to be once they take a closer look.
DIY or Call Someone?
Small cracks and cosmetic touch-ups are fair game for a DIY weekend if you’ve got basic tools and a bit of patience. Sagging ceilings, structural separation, or anything below a pool’s waterline is where I’d stop and call a professional instead. A proper repair almost always ends up cheaper than fixing the same spot twice after a rushed patch job fails.
Plaster repair sounds intimidating until you actually break down what’s causing the damage and match the fix to the problem. Get that part right, and whether it’s a crack in the hallway or a rough patch at the bottom of the pool, the repair will actually hold.